Monday, August 29, 2011

Recycled Milk Carton-Sandwich Box

 So every time we finish a gallon of milk... into the recycling bin it goes.
I had happened to run into a blog somewhere telling you how to turn your milk carton into
a sandwich container. So after a little cutting and folding I managed to make this sandwich box
Really it was pretty self explanatory, just cut 3 smallish flaps on the side and one large flap that goes
up almost to the neck of the milk carton. Then I added a button and some yarn for a clasp. 
Others use velcro but I don't have any at the moment.
~Here are some reasons why its so awesome!~
  1.  It is reusable, just wipe it out like a tupperware container.
  2. It's Eco-Friendly
  3. Save a little bit of money (if only a buck or two) by  not using baggies for the sandwiches.
  4. You can personalize it with stickers, or sharpie, or paint. I took a sharpie and put my hubbies name on it.
  5. If you don't feel like washing it, or if you forgot to take the sandwich out and its green and fuzzy, just toss the sandwich, rinse it and throw it in the recycling instead of attempting to disinfect it.


Sunday, August 14, 2011

Knitted Beret

Here is my knitted, eyelet beret. It kind of fits like a fitted hat though, 
so my next one I will have to add twice or three times the slouch, 
also that way it will fit over the ears if they get a bit chilly. 
I think it is adorable, I also added a cute button to it. 
Of course it was after I took the picture, but you get the idea!
Here are a few different ways to wear it.
Live & Love


A Pointy Hood

My next knitting project after the scarf but before the winter hat was a pointy hood.
I decided to do a pointy hood because of the ease.
You do it just like a scarf, fold it in half and then just sew up one side + a button and you are set.
I need to make it a little bit wider so that it covers more of the face,
I just acquired longer knitting needles so the next one will be wider.
It also keeps the ears warm but I will have to do some altering to make it keep the forehead warm
too and maybe hook a scarf onto it to wrap around the cheeks, 
but anyways here is the Pointy Hood. Let me know what you think!
Live & Love


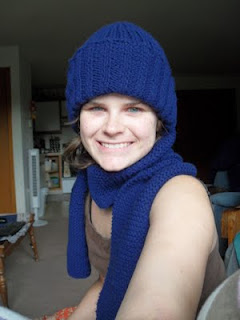
Knitted Hat W/Matching Scarf

For a few weeks this summer after the wedding, I went on a knitting frenzy
I finished knitting a scarf, It was just knit -flip-knit-flip the rows until I deemed it long enough. 
I also wanted a matching hat to go with it so thanks to my Grandmother-in-Law 
I acquired a knit 2-purl 2 pattern for a winter hat. Here are the finished products. 
The scarf measures about 3 feet long and the hat is approx 12 inches in length and 
quite stretchy to fit numerous sizes of heads. 
The yarn is just a royal blue acrylic yarn that I got in a pound skein.

Thursday, August 4, 2011

I < 3 my Apple Pie

 So I had a frozen bag of apples in my freezer from my mother-in-law that had been taunting me since I moved in with my husband. Couldn't decide what to make with it until this evening when I remembered how much my husband LOVES apple pie. I was already making another batch of tortillas so I had the table all laid out to roll out the crust. *I dislike having to clean off and disinfect a portion of the table, which is the only space big enough JUST to roll out one crust* I took the recipe from the Better Homes and Gardens Cook Book and altered it slightly. 
Picture of unbaked pie.
Apple Pie Filling:
approx 6 cups sliced apples
1 TBSP lemon juice
2 tbsp sugar
2 tbsp flour
1/2 tsp cinnamon
1/4 tsp nutmeg (btw, I pretty much NEVER measure out cinnamon and nutmeg, I just sprinkle it on until it looks about right)
Mix well and let sit a minute.

Crust:
1 1/4 cup flour
1/4 tsp salt
1/4 cup cooking oil
3-4 tbsp milk

Mix well start with 3 tbsp milk, should be crumbly, if its too crumbly add rest of milk, roll out onto slighly floured surface and beat the bajeebers out of it with a rollin' pin..... ok never mind, I have been reading too much of the  Dresden Files, but roll out the pie crust until its about 12 in. round, put it into the pie pan and take excess off edges. I used the excess to fill in the holes (I can never get it to lay in the pan pretty-like, so I end up with holes) and I made a heart for the man who has stolen mine

Fill with Pie filling, sprinkle top with sugar and cinnamon preheat oven to 375 degrees and bake the pie for about 30-40 minutes.

My husband and his pie.
I fixed it up and baked it in the oven with my husband reading his book, not 10 feet away. He didn't have a clue that I had made him a special treat, and when it was done I had him close his eyes and led him to the fresh pie. Of course the apple aroma gave it away when he got closer but it still surprised him. No particular occasion, except for the fact that I love him.

Tuesday, August 2, 2011

Cranberry Cocorum Slushie

One of my new cool off summer drinks. 3 parts Cranberry Juice, 1 part coconut rum. 
Slush up some ice in the blender and add. 
Its red, cold, and delicious.

Monday, August 1, 2011

To-To-Tortillas

So my husband and I decided to make tortillas on Sunday and boy are they delicious. Here is my recipe, I used a different recipe and altered it so that I could double it, this one is my concoction and tasty.


Ingredients:
2 1/4 cups all purpose flour
1/4 cup wheat flour
1 tsp salt
1/4 block of Lard (yes, lard is disgusting to work with, but it makes the best tortillas)
2 1/2 tsp baking powder
1 cup hot water (as hot as the tap will go)

Mix the dry ingredients, cut the lard into chunks and put into dry ingredients, mash the lard into the dry ingredients with a pastry cutter (I used a fork and it worked just as well) until its all crumbly. Pour the hot water into it and stir it all together, take your hands and knead it until its well mixed and into one -not-so-sticky ball. (at least not as sticky as it was when you poured the water in) Cover it with a towel and let sit for an hour. Then make balls out of the dough and place on a cookie sheet or plate or something so they aren't quite touching. (doubling the recipe I got 40 silver half dollar sized balls out of the recipe) you can make the balls whatever size you want. The bigger the ball, the bigger your tortilla. Let sit another 20 min and turn on the griddle to 400. Flour a clean surface and the rolling pin and roll out tortillas as thin as you can (I didn't even bother making them circular) and place on the griddle giving each side half a minute or until you can see it start to brown. Then place on a plate and cover with a tea towel. Yum, Yum.